The Solo II uses an integrated temperature sensor. By default, this is represented as temperature sensor 1 on the display. If you choose to pair an additional temperature sensor you should pair this to temperature sensor 2 (currently empty). If you wish to use two additional temperature sensors, you’ll need to overwrite temperature sensor 1.
To Pair the first temperature sensor to the Solo II follow these steps:
1. Enter the “Pair” menu (press and hold in the “-“ and “+” buttons together) and cycle through with the “+” button to [T1 SENSOR].
The display will show [NONE] if it does not have a temperature sensor paired and is using its integrated sensor.
2. If you have two temperature sensors and you are overwriting [T1 SENSOR] skip to step 3. However if you only have one extra sensor you will need to pair it to [T2 SENSOR], cycle to this option with the “+” button.
3. Ensure the display is showing [NONE]. If it shows [CONN] there is already a sensor paired and you will need to un-pair it by holding the middle in until it changes to [NONE].
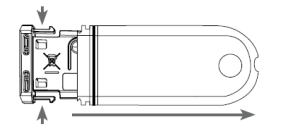
4. Squeeze the two clips on each side of the temperature sensor and slide the cover off.
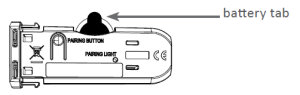
5. Remove the battery tab from the temperature sensor.
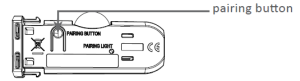
6. Press the pairing button on the temperature sensor until the red LED flashes. The display will pair and change to [CONN] and the signal strength bars will indicate the signal strength.
If you are pairing two sensors you can now cycle through to [T2 SENSOR] on the display and repeat the steps from step 3 above with the second temperature sensor.